To ascertain the condition and attributes of a computer’s graphics unit, an individual may undertake various procedures that yield detailed insights regarding the hardware element. A graphics processing unit (GPU), sometimes referred to as a graphic card, is essential for displaying pictures, videos, and other visual content on your computer screen. For optimum performance, it is crucial to comprehend its capabilities and make sure it is operating properly, particularly for graphically demanding jobs like professional design work or gaming. This is a comprehensive instruction on how to examine the graphics card in your computer:
Access Device Manager: Device Manager is a built-in utility in Windows operating systems that allows users to view and manage hardware devices connected to their computer. Press Windows Key + X and select “Device Manager” from the list. This will open the application and display a list of all your hardware components.
Access Display Adapters: Within the Device Manager, various device classifications are available. Scroll down and select the ‘Display adapters’ section to expand it. You will see the name of your graphics card displayed here.
Determine the Model and Manufacturer: The model and manufacturer of the graphics card can be found in the Device Manager. This information is essential for verifying software compatibility, updating drivers, and resolving any issues that may arise. It is advisable to record these details for future use.
Check Your Drivers and Update Them If Needed: To find driver details, simply right-click on your graphics card and select “Properties.” Under the “Driver” tab, you’ll see the current driver version and date. Keeping your drivers up to date is crucial for optimal performance and stability. If there’s an update available, you can update it right from the Device Manager by selecting “Update Driver,” or you can head to the manufacturer’s website to download the latest driver release.
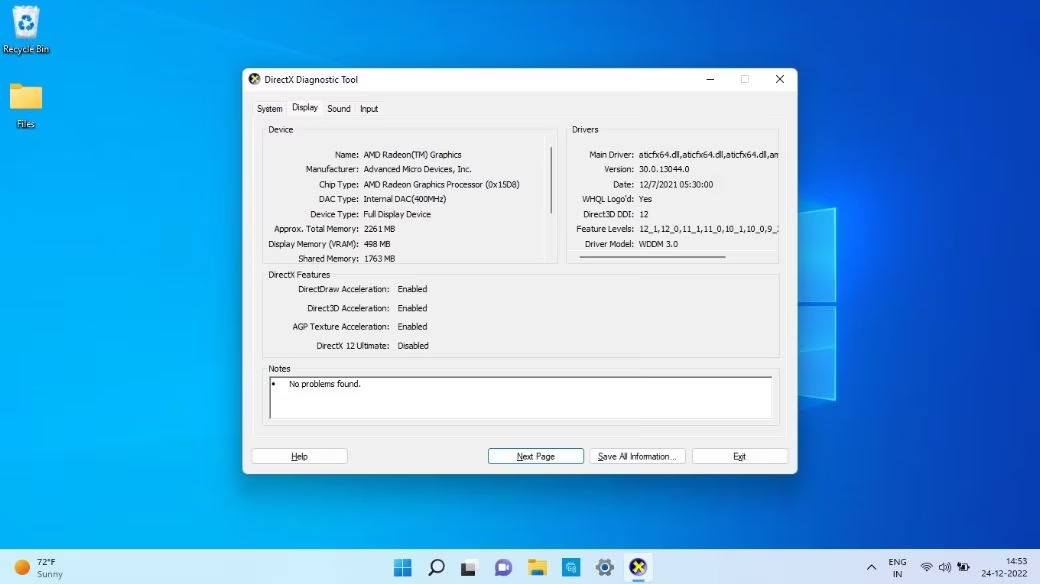
Review System Information: To verify the specifications of your graphics card, utilize the System Information utility. Press the Windows key + R, enter “msinfo32,” and press Enter. This action will launch the System Information window. On the left panel, select “Components,” then navigate to “Display.” This section provides comprehensive details, including the model, manufacturer, and amount of video memory installed on your graphics card.
Utilize Third-Party Software: Numerous third-party applications offer in-depth analysis of your graphics card’s performance and specifications. Popular options include GPU-Z, Speccy, and HWiNFO. These tools can furnish information such as GPU clock speed, memory type, and temperature, which are essential for troubleshooting and monitoring the health of the card.
Conduct a Physical Inspection: For a visual assessment, you may opt to open your computer’s case. While this step is not mandatory, it can be advantageous for examining the physical condition of the graphics card, including dust accumulation and proper seating in the PCI-Express slot. Ensure the computer is turned off and unplugged, and use an anti-static wrist strap to avoid damaging internal components. Locate the graphics card, typically a large rectangular component equipped with a fan.
Run Diagnostic Tools: Several graphics card manufacturers, including Nvidia and AMD, provide diagnostic tools. Nvidia users can utilize the Nvidia System Diagnostic Tool, while AMD users can access the “Performance” tab in AMD Radeon Software. These tools assist in identifying any issues with the graphics card and may offer potential solutions.
Perform Benchmark Testing: To assess the performance of your graphics card, consider using benchmarking software such as 3DMark, Unigine Superposition, or Cinebench. These programs evaluate the GPU’s capabilities and provide a score that can be compared with results from other users, allowing you to gauge your card’s performance relative to similar models.
Verify Software System Requirements: When installing new software, particularly games, it is crucial to confirm that your graphics card meets the minimum and recommended system requirements. This precaution can help prevent performance issues and ensure optimal functionality of your applications.
Monitor Performance During Use: While engaging with graphics-intensive applications, observe for any signs of lag, stuttering, or screen tearing. These indicators may suggest that your graphics card is not performing at its best or is struggling to meet the software’s demands.
Troubleshoot Potential Issues: If you experience difficulties, troubleshooting may involve checking for driver conflicts, updating other system components, or verifying that the power supply is adequately providing power to the graphics card.
In summary, regularly assessing your computer’s graphics card is essential for maintaining optimal performance and preventing potential issues. By following these steps, you can ensure that your GPU operates effectively and is well-suited for your intended tasks. Keeping drivers up to date and monitoring the card’s performance can significantly enhance your computing experience.